A custom canopy tent is not one purchase but a stack of decisions, and the order they are made in matters. Buyers who start with the graphic and back into everything else tend to overspend on print and underspend on the frame and the weights, which is exactly backwards. Work through the package in the order below and the quote you get back will match the way you actually use the tent. Your final quote depends on size, frame grade, print coverage, and options.
Start with size and footprint
The 10-by-10 is the default because it maps onto the standard event booth, a hundred square feet of ground that most fairs, markets, and expos sell in that increment. Under a 10-by-10 you can comfortably run one six-foot table across the front with a person or two working behind it and still have room to turn around. Step up to a 10-by-15 or 10-by-20 when you need wider street frontage, a second table, product displays along the back, or space for a line to form inside the footprint rather than out in the sun. Match the size to the space you are allotted and the number of people working under it, not to the biggest banner you can imagine; an oversized top on a cramped booth is harder to weight and just as hard to permit.
Choose the frame grade honestly
This is where the real durability money lives, and the two tiers are genuinely different products. An economy steel frame typically runs roughly one-inch legs at about a one-millimeter wall, weighs on the order of fifty pounds for a 10-by-10, and is built for occasional fair-weather use a handful of times a year. It is prone to rust where the powder coat chips, and its joints often use lower-cost plastics. A commercial aluminum frame steps up to roughly two-inch hexagonal legs at about a two-millimeter wall, weighs more overall near seventy-five pounds because the components are thicker, resists corrosion through an anodized layer, and is rated by many makers to handle winds in the mid-thirties of miles per hour. It is the frame that survives weekly or monthly use.
The price gap is real and it is honest: a printed commercial aluminum setup quotes well above a printed steel one, and the difference depends on frame grade and on the warranty, which can reach five, seven, or even lifetime terms on the frame. If the tent goes out most weekends, the aluminum pays for itself in frames you do not have to replace. If it comes out twice a summer for a company picnic, steel is a rational choice.
Specify the top fabric and the print
The top is where fabric specs and print method meet. Denier tells you the yarn weight and therefore the toughness, a waterproof rating tells you how it sheds rain, and a flame certificate is what venues and permits often demand, so confirm the top carries one before you commit. For color, full-canopy dye sublimation is the method that reproduces edge-to-edge graphics and photographic art, while simpler logo work can be handled more cheaply. Decide your imprint locations explicitly: the four canopy peaks, the four valances that hang at the edge, and any printed back wall are separate print areas, and each one you add raises the cost. A common efficient spec is full-color valances, which sit at eye level and carry the brand, with a lighter treatment on the peaks.
Add walls and accessories to match the job
Walls turn an open canopy into a booth. A full sidewall closes a back or side for wind, shade, or a clean backdrop; half-walls with a printed skirt define a counter line for a market stall; a printed back wall doubles as a photo and logo surface. Mesh walls trade weather protection for airflow at hot outdoor events. Beyond walls, plan for the unglamorous parts that decide whether setup goes smoothly: a wheeled roller bag for transport and storage, a stake kit for grass, and the weights themselves, which are not optional. Pick the accessory set from how the tent is used, not from a default bundle.
Plan the weights before the event, not at it
Weighting is the step buyers skip and regret. General manufacturer guidance puts a 10-by-10 at roughly forty pounds of ballast per leg, which is about a hundred sixty pounds across the four legs, with larger tents wanting fifty to sixty pounds per leg. In gusty conditions the common advice is to double those figures as a precaution.
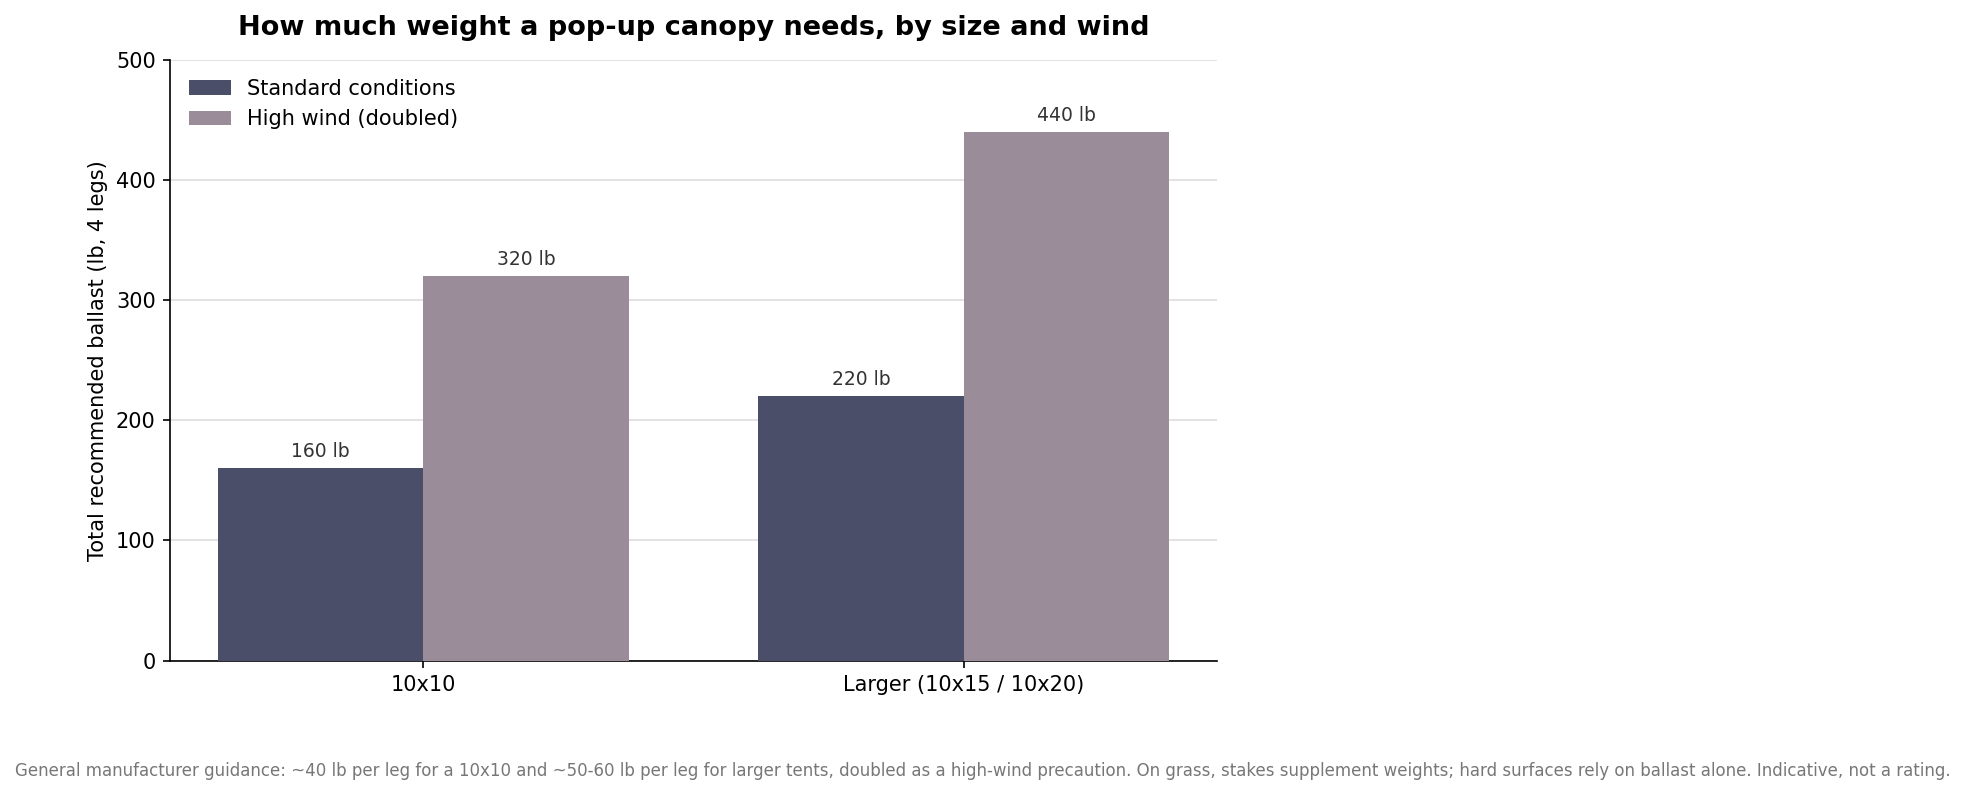
On grass you can drive stakes, which supplement the weights, but on pavement, decking, or any hard surface there is nothing to stake into and the ballast is all that holds the tent down. That is the scenario where under-weighted canopies become airborne. Distribute the weight to every leg rather than loading one corner, secure the weights so they cannot swing, and treat the numbers as a floor that rises with wind and with tent size. These are general figures, not a wind rating for a specific frame.
Put the spec together
Read back your order as a single sentence before you approve it: a size that fits the booth, a frame grade that matches how often the tent goes out, a top with the right fabric weight and a flame certificate, a defined set of print locations and method, the walls the job actually needs, a transport bag, and enough weight for every leg with margin for wind. Confirm production and shipping lead time against your first event date, and build in a buffer, because custom tops and walls are made to order. Treat the guidance here as a starting point for your quote rather than a promise; the exact price falls out of the choices above once a supplier prices them together.